[펌] 외국 블로그의 글을 갖고 왔는데, 어렵지 않아 쉽게 해석하며 끝부분에 소스가 있으니 참고하면 좋을거 같다. :)
Gallery View | Android Developer Tutorial
For this the layout xml in this case, the main.xml will have a ‘Gallery’ element as shown below:
<Gallery
android:id="@+id/Gallery01"
android:layout_width="fill_parent"
android:layout_height="wrap_content"></Gallery>
<ImageView android:id="@+id/ImageView01"
android:layout_width="wrap_content"
android:layout_height="wrap_content"></ImageView>
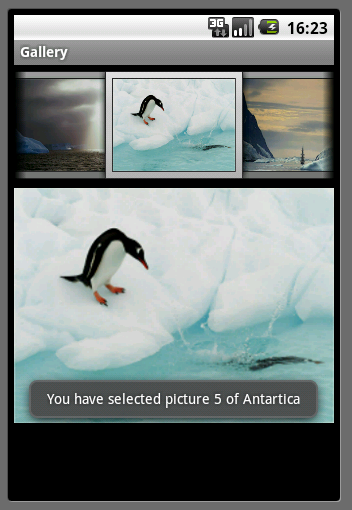
It also has an ImageView element which is used to show the selected
Image in a larger ImageView. Here is how it would look when executed.
I create an array of these resources/images in my activity with the following code:
Integer[] pics = {
R.drawable.antartica1,
R.drawable.antartica2,
R.drawable.antartica3,
R.drawable.antartica4,
R.drawable.antartica5,
R.drawable.antartica6,
R.drawable.antartica7,
R.drawable.antartica8,
R.drawable.antartica9,
R.drawable.antartica10
};
As we have seen with all the other views so far, we need to have an adapter that associates the view with the data. Here the view is Gallery and the data is the above mentioned 10 images. An Adapter plays the role of linking the two as shown below:
Gallery ga = (Gallery)findViewById(R.id.Gallery01);
ga.setAdapter(new ImageAdapter(this));
However, we do not have a readymade implementation of the ImageAdapter. We have to create our own implementation of the same by extending the BaseAdapter class. This is the core of the code in this example. The moment we extend the BaseAdapter, we have to override 4 methods. They are getCount(), getItem(), getItemId() and getView().
Before we go to each of them, let us see the constructor of the ImageAdpater:
public class ImageAdapter extends BaseAdapter {
private Context ctx;
int imageBackground;
public ImageAdapter(Context c) {
ctx = c;
TypedArray ta = obtainStyledAttributes(R.styleable.Gallery1);
imageBackground = ta.getResourceId(R.styleable.Gallery1_android_galleryItemBackground, 1);
ta.recycle();
}
…
}
It takes the context that is passed to the constructor. We need to examine this code a little. First, we can define our own resources or attributes in an XML file. Those attributes can be retrieved through the method obtainStyledAttributes. This is a method on the Context object. The returned value needs to be stored in a TypedArray object. A TypedArray is nothing but a container for an array of values that are returned by obtainStyledAttributes.
So, in my example, I have created an xml file by name attributes.xml in the res/values folder with the following content:
<resources>
<declare-styleable name="Gallery1">
<attr name="android:galleryItemBackground"/>
</declare-styleable>
</resources>
Here Gallery1 is a custom name for a style defined by us. In this style, we are trying to say what should be the background of our images. For that we are using a pre-defined backgournd in R.attr class as galleryItemBackground.
So, this is accessed in the ImageAdapter contructor through the line
ta.getResourceId(R.styleable.Gallery1_android_galleryItemBackground, 1);
ta.recycle();
The number 1 is to say that it is the first element in the attributes.xml file under the styelable Gallery1.
The rest of the over ridden methods are simple:
@Override
public int getCount() {
return pics.length;
}
@Override
public Object getItem(int arg0) {
return arg0;
}
@Override
public long getItemId(int arg0) {
return arg0;
}
@Override
public View getView(int arg0, View arg1, ViewGroup arg2) {
ImageView iv = new ImageView(ctx);
iv.setImageResource(pics[arg0]);
iv.setScaleType(ImageView.ScaleType.FIT_XY);
iv.setLayoutParams(new Gallery.LayoutParams(150,120));
iv.setBackgroundResource(imageBackground);
return iv;
}
The getView actually returns a View object when called. Here I have overridden it to return a ImageView object with the selected image inside it alosn with some scale, layout paramaters and the image background set.
Finally in the onCreate() method of the activity I have captured the onClick event on a Gallery item and within that I have toasted a message as well as displayed the image in a bigger manner below the gallery:
ga.setOnItemClickListener(new OnItemClickListener() {
@Override
public void onItemClick(AdapterView<?> arg0, View arg1, int arg2, long arg3) {
Toast.makeText(getBaseContext(), "You have selected picture " + (arg2+1) + " of Antartica",
Toast.LENGTH_SHORT).show();
imageView.setImageResource(pics[arg2]);
}
});
That is it. You may download the complete code from here.
'개발도구 > aOS - 안드로이드 개발' 카테고리의 다른 글
| [안드로이드] ListView에 header 을 달자! - addHeaderView (0) | 2011.05.23 |
|---|---|
| [Android] addHeaderView -ListActivity with a header or footer (0) | 2011.05.20 |
| [안드로이드] ListActivity 와 Adapter [펌] (0) | 2011.05.19 |
| intent.setFlags (0) | 2011.05.19 |
| [안드로이드] activitygroup sample (0) | 2011.05.18 |